
In this article: A practical, zone-based guide to designing a home gym recovery zone with an infrared sauna, a massage chair, and calm post-workout seating—plus clearance, power, airflow, lighting, and storage planning for a refined finish.
- How to Design a Home Wellness Room Around a Massage Chair and Infrared Sauna
- Massage Chair Clearance Guide: Recline Space, Walkways, Wall Distance, and Door Swing
- Home Spa Room Layout: Sauna, Recliner, Lighting, Electrical Planning, and Storage
- Can You Use a Massage Recliner in a Home Theater Room? Sightlines, Recline Angles, and Comfort
- Wellness Room Lighting Design: Color Temperature, Dimming, and Relaxation Zones
- Bedroom Wellness Corner Design: How to Place a Massage Chair Without Overcrowding the Room
- Basement Wellness Room Planning: Sauna Placement, Seating Layout, Flooring, and Ventilation
- Home Gym Recovery Zone Design: Infrared Sauna, Massage Chair, and Post-Workout Seating
- Frequently Asked Questions
A well-designed home gym recovery zone connects training to recovery with a simple flow: cool-down space first, then massage seating, then infrared sauna—supported by smart clearances, towel/storage planning, safe electrical placement, and quiet ventilation. When the layout feels effortless, you’re more likely to use it consistently, and the room stays clean, calm, and premium.

Quick Takeaways
• Design your recovery zone as a three-step loop: transition/cool-down → massage chair → sauna, with a clear path back to hydration and storage.
• Plan for real-world clearances: recline space, door swings, and a comfortable walkway so the room never feels tight.
• Build a towel + robe + water station into the layout to keep sweat, heat, and clutter contained.
• Use dimmable, warm lighting and gentle airflow so the space feels restorative rather than like a utility room.
• Prioritize dedicated circuits and outlet placement early—it is the fastest way to avoid visible cords and last-minute compromises.
1. How to Design a Home Wellness Room Around a Massage Chair and Infrared Sauna
A home wellness room works best when it’s planned in zones, not as a collection of wellness products. The goal is a calm, repeatable routine that starts the moment you step off the treadmill or rack the weights.

Start with the recovery sequence (then place the equipment)
Most people feel best with this order:
• Transition zone (2–5 minutes): light stretching, slow breathing, hydration.
• Massage chair zone (10–20 minutes): targeted muscle relief while your heart rate settles.
• Infrared sauna zone (10–30 minutes): heat for a deeper unwind (as tolerated), followed by cooling down.
This sequence also reduces mess: you’re less likely to drip sweat into the chair if you take a minute to cool down and towel off first.
Choose a zone-based footprint that fits premium homes
In refined spaces, visual quiet matters. Keep the room cohesive by grouping elements with purpose:
• Recovery anchor: place the massage chair as the focal point (it reads as furniture, not equipment).
• Heat corner: position the sauna in a corner or along a short wall to make ventilation and clearances simple.
• Soft landing: add post-workout seating (bench or lounge chair) near storage and hydration.
Make it easy to keep clean
Design decisions that protect the “always-ready” feeling:
• A closed storage cabinet for towels, wipes, and spare linens.
• A lidded hamper for used towels near the transition zone.
• A small mat zone at the sauna entry for slippers and a towel drop.
To explore recovery-first seating options, browse Valencia’s
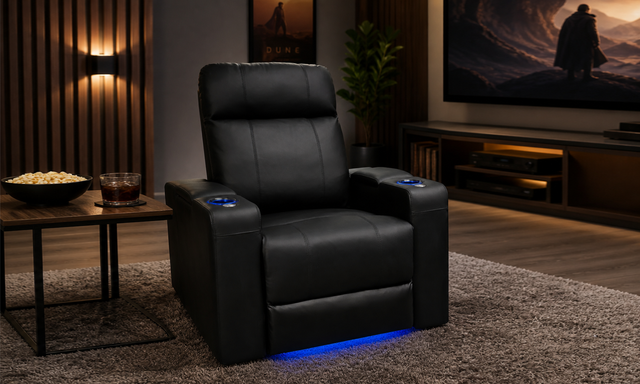
2. Massage Chair Clearance Guide: Recline Space, Walkways, Wall Distance, and Door Swing
Clearance planning is where a recovery zone either feels effortless or constantly in the way. Before you commit to placement, measure your room and sketch the swing paths.

Key clearances to plan for (practical minimums)
| Clearance item | What to plan for | Why it matters |
|---|---|---|
| Recline space | Enough length for full recline (check your model specs) | Prevents wall collisions and protects a relaxed posture. |
| Walkway width | 24–36 inches for comfortable circulation | Keeps transitions easy with towels, water, and post-workout fatigue. |
| Side access | At least one “service side” you can reach comfortably | Helps with cleaning, plugging in, and adjusting placement. |
| Wall distance | Follow the chair’s recommended wall clearance | Some chairs slide forward as they recline; others need rear space. |
| Door swing | Map the full arc of the door and any closet doors | Prevents awkward bottlenecks and accidental impacts. |
Placement tips that look clean (and feel spacious)
• Avoid “dead-end” corners where you have to squeeze past the chair to get out.
• Keep cords invisible by placing the chair near a planned outlet, not across a walkway.
• Use a rug or floor mat sized to the chair footprint so the zone feels intentional.
3. Home Spa Room Layout: Sauna, Recliner, Lighting, Electrical Planning, and Storage
Even a small home spa room can feel elevated when the infrastructure is planned up front: power, storage, and lighting. This is where a luxury wellness space separates itself from a spare room with gadgets.
Sauna placement: airflow, heat, and usability
• Leave breathing room around the sauna per manufacturer guidance for ventilation and service access.
• Don’t block returns or vents; gentle air exchange keeps the room comfortable between sessions.
• Keep a cool-down spot nearby (chair or bench) so you can exit and rest without walking through the whole gym.
Electrical planning: circuits first, aesthetics second
Because sauna and massage seating can be significant electrical loads, it’s wise to confirm requirements with a licensed electrician and follow local code. Practical planning tends to include:
• Dedicated circuits as required for the sauna and any high-draw equipment.
• Outlet placement behind/adjacent to seating to avoid visible cords.
• Lighting on dimmers (separate circuit from high-load devices when possible).
Storage that supports the routine
• Open shelf for water, electrolytes, and a small tray.
• Closed cabinet for extra towels, robe, and cleaning supplies.
• Hook rail for robe and sauna towel—placed where items can dry without cluttering the chair area.
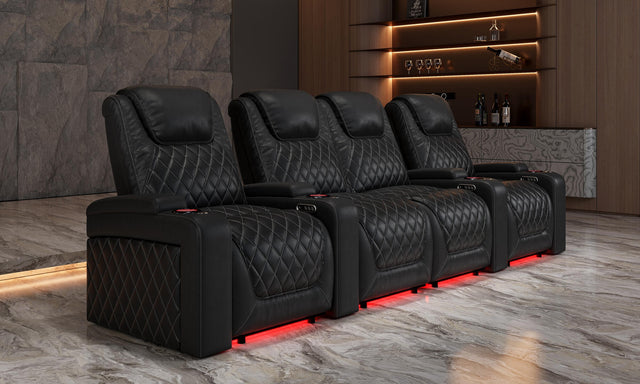
4. Can You Use a Massage Recliner in a Home Theater Room? Sightlines, Recline Angles, and Comfort
Yes—you can use a massage recliner in a home theater room, as long as you plan for sightlines, recline angles, and the practical reality that massage chairs are often larger than standard theater recliners.
Sightlines: protect your screen view
• Measure eye height in both upright and reclined positions.
• Check headrest height so it doesn’t push your line of sight too high when the chair reclines.
• Stagger seating or increase row spacing if you have multiple seats.
Recline angles: comfort without crowding
• Confirm full recline depth and whether the chair slides forward during recline.
• Leave a clear walkway so you aren’t stepping around a reclined chair in low light.
Comfort pairing: theater time vs. recovery time
If the room serves both entertainment and recovery, consider a zoning approach:
• Massage seating on the side wall or back corner (quiet, out of foot traffic).
• Traditional recliners/sofa centered for best viewing.
5. Wellness Room Lighting Design: Color Temperature, Dimming, and Relaxation Zones
Lighting sets the emotional tone of a recovery zone. The simplest upgrade is layered lighting with dimming, so the room can shift from training brightness to recovery calm.
Recommended lighting layers
• Ambient: soft overhead lighting for safe movement.
• Task: a focused light near storage/hydration for practical needs.
• Accent: subtle lamps or wall lighting near the massage chair to define the zone.
Color temperature and dimming for relaxation
• Warm to neutral light (often around 2700K–3500K) tends to feel calmer than bright, cool lighting.
• Dimmers let you lower intensity during massage and sauna sessions.
• Avoid glare aimed directly at the chair; indirect light reads more refined and restful.
Create “visual boundaries” between training and recovery
Even in one room, you can signal a shift:
• Use brighter light near weights/cardio.
• Use warmer, dimmable light near massage seating and sauna.
6. Bedroom Wellness Corner Design: How to Place a Massage Chair Without Overcrowding the Room
A bedroom wellness corner can work beautifully when it’s treated like a quiet reading nook—not a piece of gym equipment pushed into a spare spot.
Where a massage chair fits best in a bedroom
• Along the longest uninterrupted wall, so recline doesn’t clash with nightstands or dressers.
• Near a dedicated outlet to avoid cords crossing walk paths.
• Away from closet doors and dresser drawers that need swing clearance.
How to keep the space feeling open
• Limit nearby furniture: one small side table is often enough.
• Use a defined rug to make the chair feel intentional, like a lounge area.
• Hide accessories (throw, towel, wipes) in a closed basket or cabinet to keep the room serene.
7. Basement Wellness Room Planning: Sauna Placement, Seating Layout, Flooring, and Ventilation
Basements are excellent for a home gym recovery zone because they offer privacy and space. The key is managing moisture, airflow, and comfort underfoot.
Flooring choices that handle sweat and feel elevated
• Rubber flooring in training areas for durability and noise control.
• Luxury vinyl plank (LVP) or sealed flooring in recovery zones for a warmer, more finished look.
• Washable mats at the sauna entrance to contain moisture.
Ventilation and dehumidification basics
Heat and humidity management keeps the room comfortable and helps protect finishes. Depending on your climate and basement conditions, consider:
• A dehumidifier sized for the space.
• Gentle air exchange so the room doesn’t feel stale after sauna use.
• Clear pathways for airflow (avoid blocking vents with large seating).
Layout logic for basements
• Place the sauna near an exterior wall when possible (often easier for airflow planning).
• Keep the massage chair on the dry side of the room, away from sauna foot traffic and damp towels.
• Create a small changing/hydration nook near the entry to reduce clutter deeper in the space.
8. Home Gym Recovery Zone Design: Infrared Sauna, Massage Chair, and Post-Workout Seating
This is the core layout: a recovery zone that feels as natural as your workout flow. The aim is a seamless transition from exertion to restoration, with storage and comfort built in.
The ideal “three-zone” layout (simple and effective)
• Zone 1: Transition / cool-down (near gym exit): stretching mat, foam roller, water station, towel storage.
• Zone 2: Massage chair anchor (quiet center or side wall): primary recovery seat, side table for water, dimmable light.
• Zone 3: Infrared sauna corner (closest to ventilation plan): sauna, mat, hooks for robe/towel, small bench for shoes/slippers.
Post-workout seating: what it should do (beyond “extra chairs”)
Post-workout seating is the buffer between training and heat. It’s where you slow your breathing, rehydrate, and decide whether you’re ready for sauna time. Good options include:
• A compact bench with hidden storage for towels and accessories.
• A lounge chair with an easy-clean upholstery for a more residential look.
• A small ottoman that doubles as a place to set a towel or robe.
Towel, robe, and wipe planning (the difference between clean and cluttered)
• Clean towels stored in a closed cabinet within a few steps of both chair and sauna.
• Used towel drop (hamper with lid) placed before you enter the massage chair zone.
• Wipes and a small tray near seating so cleanup is quick and discreet.
Airflow and acoustics: keep recovery quiet
• Separate “heat air” from “rest air”: keep the sauna area ventilated without blasting the seating zone.
• Soft materials (rug, curtains, upholstered seating) can reduce echo and make the room feel calmer.
Refined finishing details that elevate the room
• Conceal cords with planned outlet placement and cable management.
• Match materials: wood tones, matte black hardware, and a restrained color palette read premium.
• Keep surfaces clear: one side table, one tray, one basket—everything else put away.
If you’re building your recovery zone around premium seating, start with a dedicated anchor
Frequently Asked Questions
How big should a home gym recovery zone be?
A home gym recovery zone can be compact, but it should allow safe recline space, a clear walkway, and a dedicated spot for towels and hydration. If you’re adding an infrared sauna, plan enough room to open doors fully and move comfortably between zones without squeezing past equipment.
Is it better to place the massage chair or sauna closer to the gym equipment?
In most layouts, it’s better to place the massage chair closer to the transition area and keep the sauna slightly deeper into the recovery zone. This supports a cleaner routine: cool down and towel off, then settle into the chair, then move to heat.
What flooring works best around a sauna and massage chair?
Choose flooring that is stable, easy to clean, and moisture-aware. Many homeowners use rubber in the training area and a more finished surface (like sealed flooring or LVP) in the recovery area, plus washable mats at the sauna entrance to catch moisture.
Do I need special ventilation for an infrared sauna in a home gym recovery zone?
You may not need complex ventilation, but you do need a plan for heat and humidity comfort. Gentle airflow, keeping vents unblocked, and using a dehumidifier in damp environments (like basements) can help the room stay fresh and protect finishes. Follow your sauna manufacturer’s guidance for clearances and ventilation needs.
What should I store in the recovery zone to keep it “always ready”?
Keep only the essentials: clean towels, a robe, wipes, a water tray, and slippers. Use closed storage for extras and a lidded hamper for used linens so the room stays calm, uncluttered, and easy to reset.


