
In this article: Plan a basement wellness room that stays comfortable year-round—with smart sauna placement, massage chair clearances, moisture-ready flooring, and ventilation paths that protect your investment.
- Basement constraints that change your layout plan
- Sauna placement in a basement: heat, moisture, and clearances
- Seating layout: massage chair zones, walkways, and traffic flow
- Flooring for heavy wellness seating: what holds up (and what doesn’t)
- Ventilation & dehumidification: the airflow path that matters
- Electrical & comfort details: lighting, sound, and storage
- A sample basement wellness room layout (small, medium, large)
- Frequently Asked Questions
The best basement wellness room plan starts with moisture control and a clear ventilation path—then you place your infrared sauna and massage chair so heat and humidity move away from seating and electronics, not into them. Basements can feel like the perfect “reset zone,” but they also magnify practical issues: low ceilings, limited windows, cooler slabs, and higher humidity. The right layout makes the room calmer to use and more durable over time.

If you’re designing around premium seating, start by measuring your tightest constraints (stairs, door swing, ceiling height, and a route for fresh air/exhaust). Then choose flooring that can handle both heavy chair weight and occasional moisture without warping.
Quick Takeaways
• Build the plan around humidity first: target 40%–55% relative humidity and a dedicated dehumidifier in most basements.
• Keep the sauna on an exterior wall when possible so warm, moist air has a shorter path to exhaust and is less likely to drift into seating.
• Protect your massage chair zone: keep it out of the sauna’s “air plume” and leave proper recline clearance plus 30–36 in. walkways.
• Choose flooring like LVP or sealed concrete for moisture resistance and load performance; avoid carpet in sauna-adjacent zones.
• Plan electrical early: dedicated circuits for sauna (often 120V/15–20A) and chair (typically 120V), plus accessible outlets that don’t become trip hazards.
1. Basement constraints that change your layout plan
A basement wellness room is less forgiving than a main-floor spa because the building envelope is cooler and more moisture-prone. These realities affect where you place an infrared sauna, how you protect a massage chair, and which materials last.


Moisture sources you can’t ignore
• Concrete slabs and foundation walls can transmit moisture vapor, even when they look dry.
• Seasonal humidity swings often peak in summer—exactly when you want the room to feel fresh, not sticky.
• Sauna use adds heat and localized moisture (and can intensify condensation on cool surfaces nearby).
Before you lock in a seating layout, confirm you have (or can add) a dependable dehumidification plan. The U.S. Environmental Protection Agency notes that indoor humidity above 60% can support mold growth, while 30%–50% is commonly recommended for comfort in many homes.
Low ceilings, bulkheads, and stair access
Measure ceiling height where the chair will recline and where people will walk. Bulkheads and ductwork often dictate where “tall visual elements” (sauna roofline, acoustic panels, shelving) can go. Also confirm your delivery path for both the sauna and the chair—tight turns at the bottom of stairs can become the real limiting factor.
2. Sauna placement in a basement: heat, moisture, and clearances
In basement wellness room planning, sauna placement should do two things: keep heat and moisture easy to manage and keep the rest of the room comfortable to occupy—especially your seating area.

Best locations for an infrared sauna in a basement
• Exterior wall (ideal): short, direct route for a vent fan or fresh-air strategy; easier to manage air movement.
• Near a mechanical room (often practical): easier access to power and sometimes to ducting, but prioritize quiet operation.
• Away from upholstered seating (recommended): reduces warm, moist air drifting into the massage chair zone.
Clearance and service space (plan for reality)
Follow your specific sauna manufacturer’s instructions, but for planning purposes, allocate:
• At least 12–24 in. of service access on the side with electrical connections or panels (if required).
• Door swing clearance plus an easy step-out landing area (no tight squeeze into furniture).
• Ceiling clearance that allows comfortable entry and safe heat dissipation per the sauna spec.
Keep sauna air from “washing over” the chair
Even infrared saunas can create a warm air plume when the door opens. A simple rule: don’t position the massage chair directly in line with the sauna door. If your room is narrow, rotate the sauna so its door opens toward a changing/transition zone rather than the seating zone.
3. Seating layout: massage chair zones, walkways, and traffic flow
A calm basement wellness room feels spacious—even when it isn’t—because the pathways make sense. Your seating layout should separate three zones: heat (sauna), therapy (massage chair), and transition (towels, water, storage).
Create a dedicated “chair zone”
Massage chairs and premium wellness recliners are easiest to enjoy when you can approach them from at least one side without squeezing between wall and armrest. Plan for:
• Recline clearance: space behind the chair for its maximum recline (use the model’s spec; if you’re unsure, plan conservatively).
• Wall distance: enough room to prevent scuffing and allow airflow behind the chair.
• Walkways: 30–36 in. main paths so the room still feels relaxed when someone is using the chair.
Traffic flow: “dry path” vs. “post-sauna path”
One basement-specific trick is to route sauna users away from the chair after a session—especially if towels are damp or skin is warm. If possible, create a small transition area with:
- Hooks or a towel ladder
- A lidded hamper
- A small bench or stool
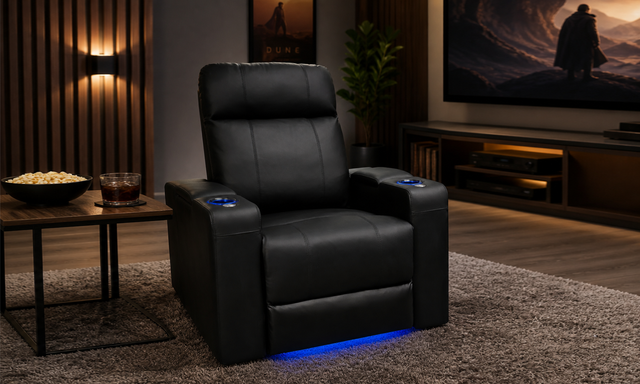
Where Valencia-style wellness seating fits best
If you’re furnishing with refined, home-first wellness seating, keep it in the quieter, drier half of the room. Place the chair so you can easily add:
- A small side table for water
- A soft, dimmable lamp (rather than overhead-only lighting)
- A grounded outlet that doesn’t require an extension cord across a walkway
When you’re ready to browse configurations, Valencia’s Wellness Series
4. Flooring for heavy wellness seating: what holds up (and what doesn’t)
Flooring is a make-or-break decision in basement wellness room planning because you’re combining heavy seating loads with moisture risk. The best floor is stable, easy to clean, and comfortable underfoot.
Basement-friendly flooring options (with pros/cons)
| Flooring type | Why it works in a basement wellness room | Watch-outs |
|---|---|---|
| Luxury vinyl plank (LVP) | Moisture resistant, durable under heavy seating, warmer than bare concrete. | Needs a flat slab; choose a quality underlayment if approved by manufacturer. |
| Sealed concrete | Excellent moisture tolerance; simple cleaning; very stable for heavy chairs. | Can feel cold/hard; add comfort with area rugs (in dry zones only). |
| Porcelain tile | Moisture proof; spa-like look; works well near sauna/changing zone. | Hard and cool; grout maintenance; consider radiant heat if budget allows. |
| Engineered wood (select products) | Warmer feel and upscale look when humidity is controlled. | Requires strict moisture management; avoid near sauna door and damp zones. |
| Carpet (limited use) | Soft, quiet, cozy underfoot in a dry seating zone. | Not ideal near sauna; can trap moisture/odors; higher risk in humid basements. |
Protecting floors under a massage chair
Even when your basement is dry, heavy seating can mark softer surfaces. Consider:
• A chair mat or protective pad sized to the chair’s base and recline motion
• Felt or load-rated furniture pads (if compatible with your flooring)
• Rugs only in the “dry zone”—not in the sauna entry/exit path
5. Ventilation & dehumidification: the airflow path that matters
Ventilation is where many basement wellness rooms succeed or struggle. Your goal isn’t just “more air”—it’s directed airflow: fresh air comes in, warm/moist air leaves, and the chair area stays neutral.
A simple airflow plan (works in most basements)
• Dehumidifier: sized for your basement area, ideally with a drain hose to a floor drain or condensate pump.
• Exhaust: a quiet bathroom-style exhaust fan or inline fan near the sauna/changing zone.
• Makeup air: undercut door, transfer grille, or dedicated supply from HVAC (as allowed by your contractor).
For comfort and material protection, aim to keep relative humidity in a steady band. EPA guidance commonly recommends keeping indoor humidity below 60% (and often between 30% and 50% for comfort).
Basement-specific placement: don’t exhaust from the chair zone
If you pull exhaust air from near the massage chair, you can accidentally draw humid air across the seating area. Instead, place the exhaust closer to the sauna side of the room so moisture is captured near the source.
When to consult a pro
If your basement has persistent dampness, visible efflorescence, or musty odors, bring in a qualified contractor before finishing the room. Moisture issues are easier (and less expensive) to address before you install flooring and premium seating.
6. Electrical & comfort details: lighting, sound, and storage
Basement wellness rooms feel “finished” when the practical details are built in—no cords across the floor, no harsh lighting, no clutter near the sauna door.
Electrical planning for sauna + massage chair
• Dedicated circuits: many saunas and massage chairs do best with their own circuits; follow manufacturer requirements and local code.
• Outlet placement: keep outlets accessible but out of splash/condensation zones and away from where towels hang.
• Cable management: route power so cords don’t cross walkways or sit under moving recline mechanisms.
Lighting: keep it calm and layered
Use layered light so you can shift the mood from “functional” to “restorative” in seconds:
• Ambient: dimmable ceiling lights (warm temperature)
• Task: a small lamp near seating
• Accent: soft strip lighting on shelving or behind a TV wall
Storage that reduces humidity problems
• Closed storage for towels and accessories (less exposure to basement air)
• A breathable spot to dry towels after sauna use (hook rail away from the chair)
• A small tray/console to keep water, robe, and controls tidy
7. A sample basement wellness room layout (small, medium, large)
Use these as starting points, then adjust to your room shape, door location, and ceiling constraints. The key is keeping a clean line between the sauna zone and the seating zone.
Small basement room (space is tight)
- Sauna on an exterior wall, door opening toward the room entrance
- Massage chair on the opposite side wall, offset so it’s not facing the sauna door
- Compact storage bench near entry for towels and slippers
- Dehumidifier near a drain point, not tucked behind the chair
Medium basement room (most common)
- Sauna in a corner near exhaust, with a small changing/transition area adjacent
- Massage chair centered on a “quiet wall” with a side table and lamp
- 36 in. walkway between zones, clear of cords
- LVP or sealed concrete under chair; tile near sauna zone
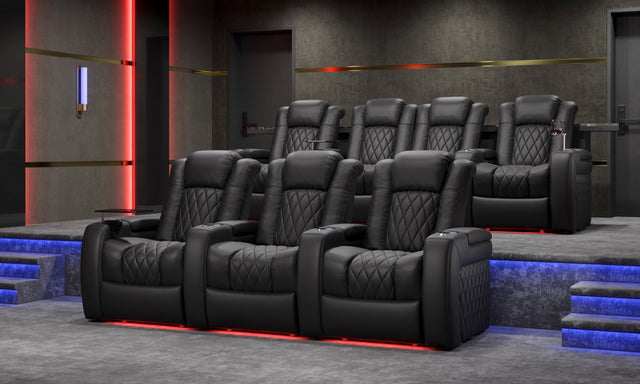
Large basement room (true wellness + media hybrid)
- Sauna and changing area on one side with dedicated exhaust
- Massage chair zone angled toward a TV or calming focal wall
- Optional second recliner or recovery lounger in the dry zone
- Acoustic softening (rugs, curtains, panels) away from sauna humidity
If you’re deciding what kind of seating footprint best matches your room size
Frequently Asked Questions
Do I need a dehumidifier for a basement wellness room?
In most basements, yes—a dedicated dehumidifier is the simplest way to keep the room comfortable and protect finishes. Even if your HVAC runs seasonally, basements often stay cooler and can hold moisture longer. Keeping relative humidity controlled also helps reduce odors and preserves flooring and upholstery.
Where should I place an infrared sauna in a basement?
Place an infrared sauna near an exterior wall or near the best exhaust path, and avoid aiming the door toward your massage chair. The goal is to capture warm, moist air near the source and keep the seating zone drier and more temperature-stable.
What flooring is best under a massage chair in a basement?
LVP, sealed concrete, and porcelain tile are typically the most basement-friendly options because they resist moisture and stay stable under heavy seating. If you prefer a softer feel, use area rugs only in the dry seating zone—not in the sauna entry/exit path.
How much space do I need around a massage chair for basement installation?
You’ll want enough room for full recline plus safe walkways—commonly 30–36 in. for main paths, and whatever rear clearance your chair requires. Because chair designs vary, check the specific model’s clearance recommendations before you commit to a layout.
Can I combine a basement wellness room with a media room?
Yes—just keep the heat/moisture zone separate from electronics and upholstered seating. Use zoning: sauna and changing area with exhaust on one side, then a drier seating/media zone with controlled lighting and comfortable pathways.


